


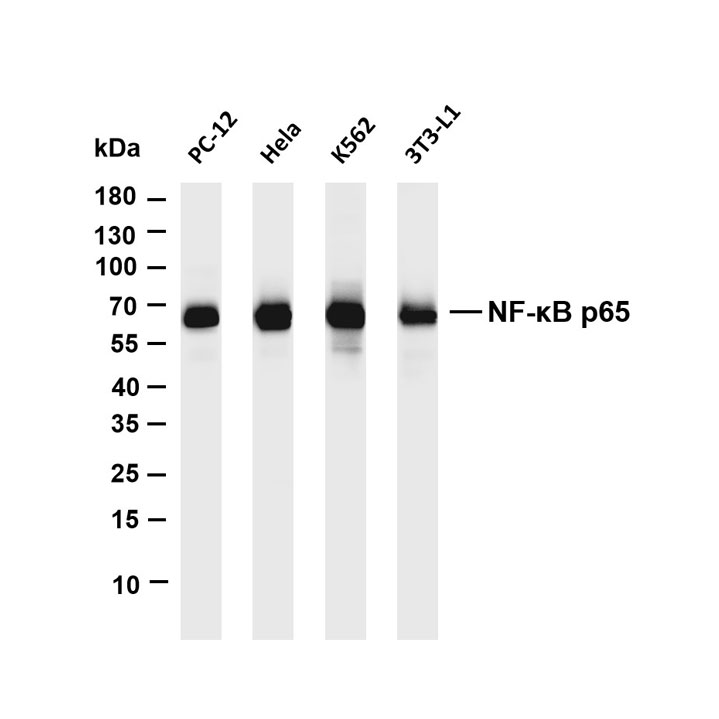
Enzyme-Linked Immunosorbent Assay (ELISA) Detailed Protocol (For Reference Only)
The core principle of the Enzyme-Linked Immunosorbent Assay (ELISA) relies on the specific binding between antigens and antibodies. It converts immune reaction signals into quantifiable color signals through substrate chromogenic reactions catalyzed by enzyme-labeled antibodies. The commonly used method is the sandwich ELISA (suitable for detecting macromolecular antigens). The detailed procedures are as follows:
I. Pre-Experimental Preparation
Reagent Preparation:
Basic Reagents: Coating buffer (commonly 0.05M carbonate buffer, pH 9.6), washing buffer (PBS containing 0.05% Tween-20, i.e., PBST), blocking buffer (PBST with 5% non-fat milk powder or 1% BSA), substrate solution (TMB chromogenic solution, protected from light), stop solution (2N H₂SO₄).
Core Reagents: Specific capture antibody (primary antibody), enzyme-labeled detection antibody (HRP-conjugated secondary antibody, targeting a different epitope of the antigen than the capture antibody), standard (target antigen with known concentration, for standard curve preparation), test samples (e.g., serum, cell supernatant, etc., requiring pre-dilution).
Equipment Preparation: 96-well microplate, pipettes and tips, microplate reader, constant-temperature incubator, plate washer (or manual washing bottle), plastic wrap.
Sample Pretreatment: Centrifuge test samples to remove impurities (e.g., serum centrifuged at 3,000rpm for 5 minutes), and dilute to an appropriate concentration with PBST based on pre-experiment results (to avoid excessively strong or weak signals).
II. Sample Loading (Standards and Test Samples)
Serial Dilution of Standards: Dilute the standard into 7 gradient concentrations with PBST, ensuring the concentration range covers the expected value of test samples.
Add Samples to Microplate Wells:
Standard Wells: Add 100μL of standard at the corresponding concentration to each well, with 2-3 replicate wells per concentration (to reduce errors).
Test Sample Wells: Add 100μL of diluted test sample to each well, also with 2-3 replicate wells.
Blank Well: Add 100μL of PBST.
Seal the plate and incubate at 37℃ for 1-2 hours to allow sufficient binding between antigens (standards/test samples) and the capture antibody coated on the well walls.
III. Adding Enzyme-Labeled Detection Antibody
Discard the liquid in the wells, wash 3 times with PBST, and pat dry.
Dilute the enzyme-labeled detection antibody to the working concentration with blocking buffer (according to the manufacturer’s instructions).
Add 100μL of diluted enzyme-labeled antibody to each well; add 100μL of blocking buffer to the blank well.
Seal the plate and incubate at 37℃ for 1 hour to allow the enzyme-labeled antibody to bind to another epitope of the antigen, forming a "capture antibody-antigen-enzyme-labeled antibody" sandwich structure.
IV. Washing and Chromogenic Reaction
Washing: Discard the liquid in the wells, wash 5 times with PBST (2 more washes than previous steps to thoroughly remove unbound enzyme-labeled antibody and reduce background), and pat dry after the final wash.
Chromogenic Reaction: Add 100μL of freshly prepared TMB substrate solution to each well (operate in the dark; substrate must be prepared fresh before use). Seal the plate and incubate at 37℃ in the dark for 10-20 minutes (adjust according to chromogenic intensity; stop when obvious blue color appears in high-concentration standard wells).
V. Stopping Reaction and Reading
Stopping Reaction: Quickly add 50μL of stop solution (2N H₂SO₄) to each well; the solution color will change from blue to yellow, and the reaction will terminate immediately.
Reading: Within 10 minutes, place the microplate into a microplate reader, select a wavelength of 450nm (if a reference wavelength is available, set to 630nm to subtract background), and measure the absorbance (OD value) of each well.
VI. Result Analysis
Data Processing: After subtracting the OD value of the blank well, use the microplate reader’s built-in software or Excel to generate a standard curve with the standard concentration as the abscissa (X-axis, logarithmic scale is preferred) and the corresponding OD value as the ordinate (Y-axis). Calculate the regression equation (R² ≥ 0.98 to ensure a good linear relationship).
Quantitative Calculation: Substitute the OD value of the test sample into the regression equation to calculate the concentration of the target antigen in the sample, then multiply by the sample dilution factor to obtain the final actual concentration.
Result Interpretation: The positive judgment standard is usually "sample OD value > 2 × blank well OD value". Analyze the expression level of the antigen in the sample combined with the quantitative results.
Related Resource Links


Related Promotional Journal Downloads


Explore Our Recommended Popular Products
More products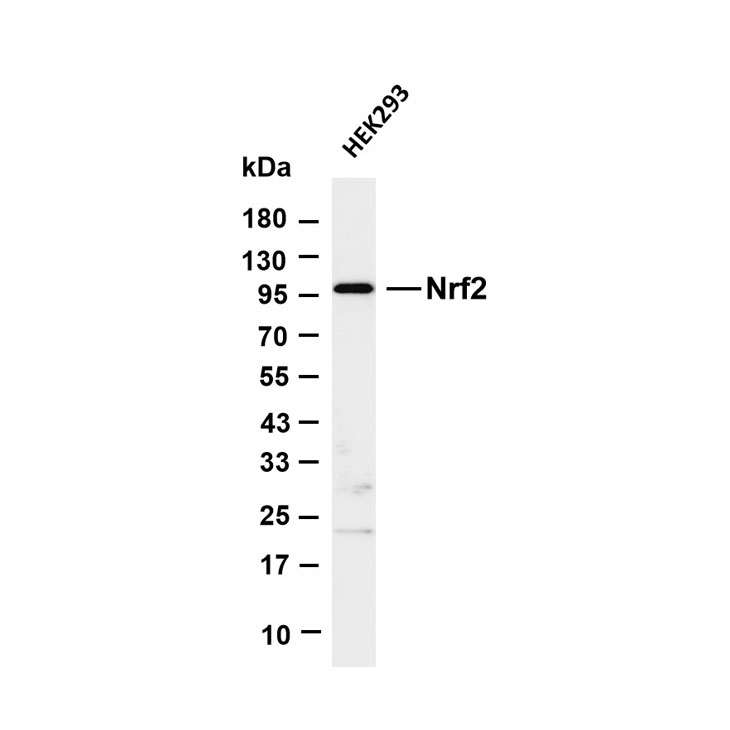


30,000+ high- quality products available online
Primary Antibodies, Secondary Antibodies, mIHC Kits, ELISA Kits, Proteins, Molecular Biology Products,Cell Lines,Reagents ...
Contact Us
-

400-801-6722
-

support@lamarck.cn
-


Order
-

Message